By Kristin Ashley
Media Lab Assistant
I find that nature photography can be a rewarding and pleasant pursuit. You get to spend time in nature, which is always restorative, and your subject matter may include landscapes, wildlife, plants, trees and flowers all taken in different seasons and environments. Getting that perfect shot takes some artistry to develop your “eye,” and a basic knowledge of photography skills. But many photographers, both amateur and experienced, wonder how to compose that perfect shot that will let others see the scene the way that they saw it, and capture the feeling of “being there.” This article will help you with some basic guidelines to help you get that perfect nature photo with a digital single lens reflex camera (or DSLR).
Painting with Light
Photography is also known as “painting with light.” There are a few basic tools that are worth exploring. I often suggest shooting in the Auto mode for beginners but be sure to pay attention to the settings your camera chooses in any given situation. Make notes and review the meaning of the settings. This will help you when you are trying to quickly capture that special shot!
![]()
Shutter Speed, ISO and Aperture–Oh My!
The exposure of an image is controlled by these 3 features. Once you know how they work together, it will enable you to use a “manual” or “aperture priority” setting on your camera. This will give you a lot more flexibility with composing your perfect shot. The descriptions and the illustration below will help simplify the DSLR photography process.
- Shutter Speed: The part of the camera that opens and closes to allow light in. Faster speed: less light, slower speed: more light.
- ISO: How sensitive the image is to light. Low numbers (100) are used for daylight, higher numbers in darker situations (3200).
- Aperture (f-stop): The size of the opening in the lens. Larger openings let in more light, smaller openings let in less light.
![]()
Flash or No Flash?
I generally make it a practice not to use a flash outdoors, but rather adjust the natural light by using the settings listed above. A flash can cause a harsh illumination that may look unnatural. If you are shooting late in the day (at or after dusk), opening up your aperture to 5.6 or lower, setting a high ISO (say, 6400), using a slower shutter speed (60 or lower), plus a tripod to steady the camera will get you the results you are looking for.
Depth of Field
Manipulating your settings to achieve “depth of field” allows you to focus in on the subject while blurring the background. This is best accomplished by starting at what I call the “5.6/125 rule.” To achieve the blurred background effect below, I “stopped down” the f-stop to its widest opening which was 5.6. I then set the shutter speed to 125/1000. (Note that for daylight, your ISO will be generally set between 100-400.) I then focused on the chickadee and voila–a lovely autumnal scene with the chickadee perched on the thistle in the foreground.
![]()
Composing with Intention
I have found that it is best to assume that Photoshop won’t be able to fix everything in your final photo. For instance, a blurred photo or overexposed is almost impossible to fix because the information simply isn’t there. I have had some luck with lightening darker images while retaining detail, but sometimes that isn’t possible either. So, I compose the shot the way I’d like to see the final version when at all possible. This includes framing the shot as best I can depending on subject distance and “bracketing” the image. Bracketing is taking several quick shots in a row while adjusting variables like light (aperture) and motion (shutter speed).
Focus on the Foreground
Consider including some foreground interest to lead your eye into the image, especially when you are trying to capture an expansive vista. Focusing on an object in the foreground—whether a natural object like a rock, plant or tree, or a manmade architectural object like a fence or an open gate, for example—gives the viewer an entry into the scene, as though they were right there alongside you as you took the image. The exception to this rule would be for birds or wildlife, when you always want to try to focus right on the bird’s eye. That way, you can avoid having the branch in front of the bird be in focus while the bird remains a blur. (Said from experience as I remember the rare sighting of an indigo bunting that was just a blue blur, while the boring branch in the foreground was in perfect focus!)
Watch for Distractions
Be aware of distracting power lines and rooftops when you compose the shot. There is nothing worse than trying to capture a beautiful sunrise and trying to photoshop out those distracting power lines or having a branch blur right in front of the unusual bird you happened across.
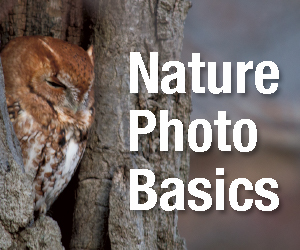
Balance the Image
A centered horizon line can be very effective for a line of autumn trees reflected in a lake–or a selfie! But to achieve a pleasing balance when you have a composition with a single subject, I suggest using the “rule of thirds.” For example, with the photo below, rather than being dead center, the owl in the fills the left 1/3 of the image and the background fills the other 2/3.
![]()
Another way to compose an aesthetically pleasing image is to use the Fibonacci Ratio, also known as the Golden Mean (below). This ratio is based on the one-inch square at the center of the spiral, and the grid builds upon it by doubling the area with each successive step.
![]()
Choose the Right Lens
When photographing birds, you’re going to need a long lens so that you don’t disturb their nesting routine or habitat. But if you want to photograph bears, you’re going to need a REALLY long lens–on second thought, don’t bother with bears! There are plenty of other wildlife shots you can get that won’t risk your safety.
When shooting landscapes, a wide-angle lens can give you a sweeping view as big as all outdoors. A zoom lens is a great asset for wildlife or plantlike, as it lets you get close to the subject without disturbing wildlife or trampling wildflowers. And when you want a single image of that single beautiful rose, a macro lens lets you get up close and see all the detail.
Dress the Part (and Dress for the Weather)
The clothes you wear should both protect you from the elements and allow you to blend into your surroundings, especially when photographing wildlife. You don’t have to go full camo, but wearing clothes in shades of brown, gray, tan and green will help you blend in and not startle the wildlife. (However, if you are going off trail during hunting season, though, you will want to wear a bright color like orange.) Birds see in many colors–in fact they see well into the ultraviolet range– and “unnatural” colors like white or blue can startle them.
Dressing in layers with long sleeves, long pants, comfortable hiking shoes or boots and socks are a must as you will need to protect yourself from poisonous plants, insects that will bite an exposed ankle or sticks that may get stuck in an open sandal. A vest or anything with pockets is a big help for keys, smartphone and small items like sunscreen and bug spray. (Gone are the days when you had to carry extra film but an extra memory card, minimum 64 GB isn’t a bad idea.) Depending on the season, adding a fleece layer will be welcome as the day cools. A hat, a bandana or neck gaiter aid in shielding you from the elements (both of which functions as a mask if you pass others on the trail). If you’re going to be out for several hours, a small backpack with a container of fresh water completes your outfit. Tucking a quart-size ziplock into your pocket isn’t a bad idea either, in case you run into drizzle or mist. At least you can cover your lens! A monopod serves as both a walking stick and substitute for a tripod to steady your camera during daylight hours in a pinch. (I’ve found that I don’t really need a tripod unless I’m shooting at sunset or dusk.)
Accentuate the Seasons
Look for those iconic images that celebrate each season. A snowy road leading to a country house brings the warm feelings of the holidays to life, while a hummingbird sipping from a flower brings happy memories of those lazy days of summer, and a red maple against a blue sky enhances the beauty of autumn.
![]()
Frame Your Image
Framing your image is an important part of every great shot. While you can always crop in more on a shot later, it’s good to get in the habit of using your creative eye to frame the image as you are composing the shot. I always try to photograph my subject as close as I envision the final image. Using perspective to lead your eye into the photo is another way you can bring the viewer right into your image. Or, try a different viewpoint: an upwards shot of a stand of tall oaks is much more arresting than a straight-on view of the trunks.
![]()
Think in the Abstract
Nature photography does not have to be limited to recognizable objects. I have had some interesting compositions occur while playing with light–and darkness. For instance, if it gets too dark to photograph hummingbirds, why not try drawing one in the air with a flashlight? That’s how I got this image below! I used a very slow shutter speed and stood in front of the camera on a tripod, drawing with the lit end of the flashlight. Or, try photographing fireworks while gently shaking or moving the camera.
![]()
Light, Shadow and Reflections
Observe the natural world and try taking photos at different times of day and in different light that show the beauty of shadows and reflections. I’ve found that you can get some richly colored flower shots on a cloudy day, for example. Or try photographing at the “Magic Hour” of 4-5 pm when the sun is bathing everything in a golden light.
![]()
There’s No Place Like Home
You don’t always have to roam far afield to get some great nature images. Be aware of your own natural surroundings and practice your skills by photographing the wildlife and landscapes right in your own yard or neighborhood. You may capture the motion of a cardinal in flight by learning more about shutter speeds, and then you will be ready when you go on that eagle viewing adventure. Or you may capture that perfect sunset right from your own backyard!
Did you know that you can check out a Canon Rebel DSLR camera at the Lake Forest Library to hone your photography skills or "try before you buy" a DSLR? Just ask us at the circulation desk.
The media lab is available for individual virtual sessions! You can fill out the form at lakeforestlibrary.org/techhelp to sign up for a 1-hour one-on-one appointment. Or, give us a shout at MediaLab@lakeforestlibrary.org.